THREE-POINT BEND TEST OF WET AND DRY MOUSE TIBIA
LAST UPDATED: 11/05/2019 by Zack Berent
I. Lab Logistics and Location
II. Motivation for the lab
III. Background
IV. Relevant Literature
V. Pre-lab Assignment
VI. Methods
VII. Analysis of Results and Discussion of Findings
VIII. Directions for the Teaching Assistant
I. Lab Logistics and Location
The third lab requires three meetings. The first meeting will be in the regular lecture room as scheduled. The TA will present an introductory lecture on three-point bending and bulk properties of a material.
For the second meeting students will meet according to their scheduled lab time for specimen preparation in 111 MEB. Here, you will have the opportunity to dissect tibias from mice. As mice are commonly used as research models, this lab is opportunity to perform common practices in modern medical studies. You will be first instructed on how to dissect tibias from hind legs of mice and then dissect the tibia yourself.
For the third meeting, students will meet for only 30 minutes of their scheduled lab time. We will meet in AMTEL, a lab in the basement of Talbot Lab, and will last 30 minutes. Meet the TA in the basement by the crane bay and large jet engines, but please stay out of the machinists’ way. In this lab, we will perform 3-point bend tests on tibia samples harvested during the second meeting.
Lab Write Up Policy
This lab may be written individually or in pairs. Lab reports will adhere to the normal 2-page extended abstract style report; see Lab Resources for more information. Your references can be listed on an additional page.
II. Motivation for the Lab
One of the main concepts of this course has been how important environmental conditions are for obtaining true mechanical measures of biological materials. One such environmental factor is tissue hydration. Bearing in mind that all biological tissue is hydrated in vivo, it is crucial that hydration be maintained during in vitro testing if true mechanical properties are to be obtained. Biological tissues, and thus their mechanical properties, are sensitive to environmental conditions. In this lab, we study the effects of hydration on the mechanical properties of tibias from mice. We will test “wet” tibias, or bones for which hydration will be maintained close to the in vivo hydration state, and “dry” tibias, or bones which will have been allowed to dry for at least 24 hours.
Although wet bone is more accurate as compared to healthy in vivo conditions, dry bone is brittle and may be used to model diseases like osteogenesis imperfecta or the natural aging of bone.
In this course, we also have discussed the difference between apparent material properties and solid material properties, and why we must know the difference between the two and why both are important. In comparison to the nanoindentation lab in which we will test for differences in mechanical properties between osteons and interstitial sites, here we are testing for the apparent modulus of the whole bone specimen.
As discussed below, several bones, such as the femur, are commonly loaded in bending, and thus the whole bone bending properties are important for design of bone replacement implants.
III. Background


The 3-Point Bend Test
The 3-point bend test is a common tool for characterizing material properties. Using Euler-Bernoulli beam theory and assuming the tibia is a uniform cylinder with a circular cross-section, we can calculate the yield stress in bending, ultimate stress in bending, Young’s modulus, and modulus of toughness of a material. The 3-point bend test will be discussed in further detail during the introductory lecture.
Prior to this lecture, you may benefit from independently reviewing information related to the 3-point bend test discussed in your introductory mechanics of materials textbook or online. A good start is to review the theoretical background for the 3-point bend test put together by Professor Rod Lakes at the University of Wisconsin.
Visual Summary of the 3-point Bend Test
The schematic below illustrates the loading of the femur in vivo. The points of loading are the hip joint and the knee joint, and because of the shape of the bone, the bone experiences a bending moment. However, as we cannot easily replicate this loading experimentally, we will test the tibia with a load at the mid-span, as the tibia is a simpler shape and this loading condition is easier to analyze using beam theory. Still, this visual is provided to you because it does a nice job of illustrating a bending moment in the shaft of a long bone (take note of the neutral axis, the side of the bone that is under compressive loading, and the side of the bone that is under tensile loading).

IV. Relevant Literature
The following readings are recommended.
- Schriefer, A. Robling, S. Warde, A. Fournier, J. Mason, and C. Turner “A comparison of mechanical properties derived from multiple skeletal sites in mice.,” Journal of Biomechanics 38, 467-475 (2005)
- van Lenthe, R. Voide, S. Boyd, and R. Muller “Tissue modulus calculated from beam theory is biased by bone size and geometry: Implications for the use of three-point bending tests to determine bone tissue modulus.,” Bone 43(4), 717-723 (2008)
V. Pre-lab Assignment
Submit the pre-lab assignment to Compass by 11:59 PM of the Friday of Sample Prep. Components of the pre-lab assignment must be done individually; some components of the lab may be done individually or as part of a pair.
VI. Methods
Dissecting of Tibia from Mice for Use in 3-point Bend Tests
Tibia will be harvested from mice that were a part of an independent scientific investigation. We will obtain just the carcasses from the Division of Animal Research. While working with mice carcasses, it is important to review the relevant Occupational Health and Safety (OHS) guidelines.
During the dissection, it is important that you exercise vigilance as you work with scalpels (e.g., cut away from yourself). To this end, you must be gloved at all times during the dissection. You will need the following materials to aid you in the dissection:
- Disposable scalpels (#11)
- Disposable gloves
- Dissecting forceps
- Dissecting scissors
- Petri dishes
- Foil
- PBS solution
- Face mask (optional)

Your approach to dissecting the tibia from the hind legs should be as follows:
- Set up work area by laying down aluminum foil.
- Lay mouse on its back and make a long vertical incision with the scalpel from the bottom of its thorax to its tail.
- You can either dissect the left or the right hind leg first. Once you have selected which hind leg to dissect first, remove the outer layer of skin and fur from this leg using scalpels, tweezers, and scissors. Exercise intuition here.
- Articulate the leg to find the attachment point of the femur to the hip (i.e., ball and socket joint of the hip). Carefully, separate the leg from this joint by gently tugging or making a careful cut at the attachment point.
- Locate the knee joint of the mouse to differentiate between the tibia and the femur. Separate the tibia from the femur by gently pulling them apart. Begin coarsely cleaning the soft tissue off of the tibia. Cleaning soft tissue off the bone is a tedious process. Many cleaning “passes” may be needed.
- To remove the foot from the distal end of the tibia, articulate the ankle joint to determine the exact location of the connection. Use dissecting scissors to cut on the foot itself very close to the joint, but not on the joint. Excess bones from the foot can always be pulled off, but the end of the tibia cannot be added back on.
- Continue to remove soft tissue by using the scalpel and tweezers to scrape or pull it off until the bone is completely clean. Be very careful to not break the bone. Gently remove the fibula if it is still attached to the tibia.
- Repeat the process for the other hind leg.
- Hand the cleaned tibias to the TA. The TA will wrap the tibias in PBS-soaked gauze and put them in deep storage (-80 Celsius) until the bones are ready to be subjected to their randomly assigned environmental condition: dry or wet for at least 24 hours prior to the 3-point bend tests.
- Tools and surfaces should be sterilized with 70% ethanol and cleaned vigorously of all tissue and blood after use. Scalpels should be discarded in a sharps container.
Testing
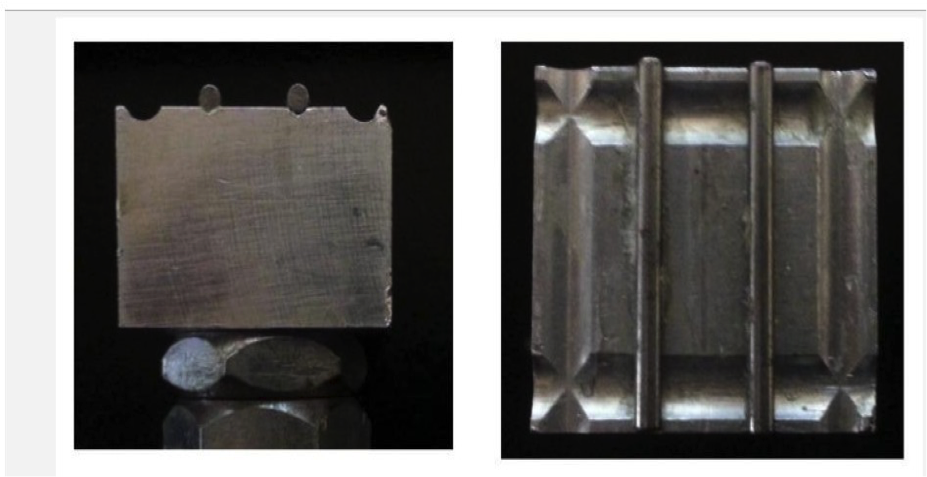
The Instron 8500 was used for 3 point bending with a custom-built fixture with a span length of 8.12 mm.
Load Function
The specimen was loaded using position control at a rate of 0.05 mm/sec to the point of failure or a maximum of 2 mm.
VII. Analysis of Results and Discussion of Findings
Data Set
Data from testing will be provided, as well as sample number, dry or wet, and diameter. The file names will reveal both the sample number, as well as whether the sample was dry or wet. During testing some wet samples slipped; those have already been removed from the data. Recall from the statistics lecture that t-tests and ANOVA are only valid for populations of similar size and variance. Keep this in mind to determine if t-test is appropriate or if you should consider other methods.
The maximum bending stress, σ, which occurs at the midpoint of the specimen (x = L/2) at the furthest distance from the neutral axis (y= r), can be computed from the load, P, span length, L, and specimen radius, r.

The yield stress and ultimate stress in bending can be determined by plotting the maximum bending stress vs deformation. The Young’s Modulus can be determined from this graph. After finding the slope of the best-fit line of the linear elastic region, Young’s Modulus can be determined using:

You will also compute modulus of toughness, u (GPa). First, you will have to absorbed energy, U (Joules) by taking integral of the stress-deflection curve using a Riemann Sum. The modulus of toughness is the energy absorbed normalized by specimen parameters:

In summary,
Independent Variable:
- State of Hydration (Wet or Dry)
Dependent Variables (what you will determine from your data):
- Young’s Modulus
- Yield stress (in bending)
- Ultimate stress (in bending)
- Modulus of toughness
Guidelines for Your Lab Report
Formatting Requirements
This report must be submitted in the Extended Abstract Style. You can submit this report individually, or in pairs. While the list below does not include everything you may discuss in your report, your report must contain all the items below.
When writing your Introduction section,
- Briefly review the concepts of three-point bending including its relevance and advantages to other testing methods.
- Review relevant information from lecture about bone’s mechanical properties, relating mechanical and biological factors.
- Discuss the larger impact of this work. It would be helpful to think about some of the applications of studying fracture properties of bone (hints: auto accidents, sports injuries, ski boots, fracture fixation devices, prosthesis). Say something about why this is potentially useful knowledge.
- Our research question and hypothesis for this lab.
When writing the Methods section,
- Describe the procurement of tibia during sample prep.
- Describe the procedure for three-point bending testing.
- Describe the three-point bending analysis with relevant equations or assumptions.
- Describe the statistical methods.
When writing the Results section,
- Include a table with mean and standard deviation values for Young’s Modulus, yield stress in bending, ultimate stress in bending, and modulus of toughness for wet and dry bone, along with any significant differences after statistical analysis.
- Include a bar or box plot with Young’s Modulus, yield stress in bending, ultimate stress in bending, and modulus of toughness for wet and dry bone, in a bar or box plot along with any significant differences.
- Include representative plots for stress-deflection curves for wet and dry bone.
- Report the results of Young’s Modulus, yield stress in bending, ultimate stress in bending, and modulus of toughness for wet and dry bone.
- Report the brittle or ductile behavior of each type of bone with references to the stress-deflection curve.
In the Discussion section,
- Conduct a brief literature in order to compare our values for Young’s Modulus, yield stress in bending, ultimate stress in bending, and modulus of toughness to those published already. Comment on possible differences and the sources of differences if they exist.
- Based on the results for brittle and ductile behavior, is dry bone a good proxy for aged bone? Be very explicit in your reasoning. In going from wet bone to dry bone (or young to old bone, does the bone’s ability to absorb impact energy (toughness) decrease or increase?
- What are the limitations in the experimental set-up and sources of error in measurements? How might future tests be conducted to avoid these?
- While we used state of hydration as an independent variable, what other factors can affect the strength of the bone? What might we explore in future investigations?
In the Conclusion section,
- State the major conclusions from this study.
- State how this study contributes to the larger questions from in the Introduction.
VIII. DIRECTIONS FOR THE TEACHING ASSISTANT
The information below is intended primarily for the lab teaching assistant.
Biosafety
To ensure safe handling and disposal of animal tissue, it is recommended that the TA successfully complete the Understanding Biosafety training module from the Division of Animal Research at the University of Illinois at Urbana-Champaign.
Sample Disposal
Samples post-testing and all other biological waste that is generated should be discarded in accordance with the policies detailed by the Division of Research Safety (DRS) in the Treatment and Disposal of Biological Materials. To schedule pickup of pathological waste for incineration, the TA should go tohttp://www.drs.illinois.edu/biowaste. The TA should ensure that a completed DRS Incineration Tag is securely attached to the handle of each bag. Refrigerate or freeze waste between disposal and pickup.
Requisite TA Training
- In order to instruct students about the sample preparation undertaken for 3-point bend tests of mouse tibia, the TA should practice and gain sufficient experience dissecting tibia bones from mice carcasses.
- The TA should receive training on the load frame in AMTEL. The training is available during limited times and has to fit into the schedule of the director of AMTEL, Dr. Gavin Horn. The TA should aim to make initial contact as early as possible and before the start of the semester if possible to schedule this training.
- The TA should become comfortable with the concepts important to 3-point bend tests and beam theory by reviewing appropriate textbooks and literature.
- The TA should ensure that the “Bill of Materials” is fulfilled prior to beginning this lab.
Bill of Materials
Introductory 3-Point Bend Lab Lecture
Source: The TA
The TA presents an introductory lecture on the 3-point bend testing and Euler-Bernoulli beam theory. It is important that the TA prepare for this lecture by reviewing literature, as well as consulting other resources as necessary.
Leading Harvesting of Tibias from Mice Carcasses
Source: TA
The TA will lead students in harvesting tibias from mice during small-group (6 to 7 students) dissection sessions that will take place in MEB 111/113.
Mice Carcasses
Source: Division of Animal Research
To provide the Division of Animal Research (DAR) sufficient lead time, it is advised that the TA contact Jesse Southern [jsouther AT illinois DOT edu] at DAR at least 10 weeks in advance of the lab start date. The TA should aim to make initial contact as early as possible and before the start of the semester if possible. The quantity of mice carcasses to be minimally requested from DAR will be determined by the number of students in the class (one carcass per student). However, it is a good idea to request more carcasses than there are students in the course.
3-Point Bend Tests
Source: TA
The TA will perform the 3-point bend tests alongside students in AMTEL. For this lab, the TA should act as a facilitator. The 3-point bend test is quick and generally proceeds seamlessly, which enables significant hands-on time for students. Students will be able to perform the 3-point bend test in pairs and interact with the instrument, samples, and software. It is important that the TA contact the AMTEL staff member (Dr. Gavin Horn) at the beginning of the semester in order to reserve the time for the 3-point bend labs in AMTEL.
Phosphate Buffered Saline Solution 1X
Source: Life Sciences Storeroom at the University of Illinois at Urbana-Champaign
-20C Freezer
Source: Mechanical Engineering Building, Room 111/113
Custom 3-Point Bend Fixture for Mouse Tibia
Source: Mechanical Engineering Building, Room 111/113
Scalpel Disposable #11
Source: Life Sciences Storeroom at the University of Illinois at Urbana-Champaign
Latex/Nitrile Disposable Gloves
Source: Life Sciences Storeroom at the University of Illinois at Urbana-Champaign
Bench Paper (Green)
Source: Life Sciences Storeroom at the University of Illinois at Urbana-Champaign
Lab Utensils and Materials
Source: Mechanical Engineering Building, Room 111/113 or Life Sciences Storeroom at the University of Illinois at Urbana-Champaign
a. Biohazard Trash Bags and DRS Incineration Tags
b. Dissecting Tools (dissecting scissors, forceps, etc.) for Small-Group (6 to 7 Students) Student Dissection Sessions
c. Surface Disinfectant (70% Isopropyl Alcohol)
d. Petri Dishes